Ever wondered if your API has enough security to keep hackers at bay? Here's the reality, many beginner developers celebrate when their API works but completely forget about protecting sensitive data from prying eyes. The solution? Implementing token-based authentication for your APIs and Laravel Sanctum is the perfect tool for the job.
Laravel Sanctum gives you a lightweight authentication system that's perfect for SPAs (Single Page Applications), mobile apps, and simple APIs. In this guide, we'll explore what Laravel Sanctum brings to the table and walk through implementing secure API authentication in Laravel.
What is Laravel Sanctum
Laravel Sanctum is Laravel's official package that handles token-based authentication for Laravel applications. Unlike the more complex Laravel Passport (which uses OAuth2), Sanctum is designed specifically for Single Page Applications, Mobile Apps, and Simple API. Sanctum works with two different approaches:
-
API Tokens - for applications that need classic token-based authentication
-
Cookie-based SPA Authentication - for SPAs running on the same domain, using secure session cookies
For this tutorial, we'll focus on API Token Authentication.
Key Features of Laravel Sanctum
Laravel Sanctum comes packed with useful features that make authentication a breeze :
- API Token Authentication
- SPA Authentication
- Mobile App Authentication Support
- Token Abilities / Scoped Tokens
- Token Expiration
- Easy to Use and Lightweight
Getting Ready
Before we dive into implementing Laravel Sanctum, make sure you've got:
- Laravel 12.x installed and running
- PHP 8.2 or higher
- Composer
- Basic understanding of Laravel concepts
- A database (MySQL, PostgreSQL, etc.)
Installing Laravel Sanctum
Open your terminal and run this command to install Sanctum :
composer require laravel/sanctum
Next, publish the Sanctum configuration:
php artisan vendor:publish --provider="Laravel\Sanctum\SanctumServiceProvider"
Run the migration to create the necessary database tables:
php artisan migrate
Configuring Laravel Sanctum
- Setting Up Middleware
Open bootstrap/app.php and add this code:
$middleware->statefulApi();
and
api: __DIR__.'/../routes/api.php',
Here's what your complete app.php file should look like:
return Application::configure(basePath: dirname(__DIR__))
    ->withProviders()
    ->withRouting(
        web: __DIR__.'/../routes/web.php',
        api: __DIR__.'/../routes/api.php',
        commands: __DIR__.'/../routes/console.php',
        health: '/up',
    )
    ->withMiddleware(function (Middleware $middleware) {
        $middleware->statefulApi();
    })
    ->withExceptions(function (Exceptions $exceptions) {

    })->create();
- CORS Configuration
Run this command to publish the CORS configuration file:
php artisan config:publish cors
Update config/cors.php to allow credentials:
'supports_credentials' => true,
- Token Expiration Settings
Open config/sanctum.php to set token expiration time (in minutes):
'expiration' => 60 //1 hour
Implementation
- Configuring the User Model
Open app/Models/User.php and add the HasApiTokens trait :
<?php
namespace App\Models;
use Laravel\Sanctum\HasApiTokens;
class User extends Authenticatable
{
   use HasFactory, Notifiable, HasApiTokens;
}
- Creating the Controller
Generate an AuthController to handle authentication processes :
php artisan make:controller Api/AuthController
Open the AuthController file and add this code:
<?php
namespace App\Http\Controllers\Api;
use App\Http\Controllers\Controller;
use App\Models\User;
use Illuminate\Http\Request;
use Illuminate\Support\Facades\Hash;
use Illuminate\Validation\ValidationException;
class AuthController extends Controller
{
    public function register(Request $request)
    {
        $request->validate([
            'name' => 'required|string|max:255',
            'email' => 'required|string|email|max:255|unique:users',
            'password' => 'required|string|min:8|confirmed',
        ]);
        $user = User::create([
            'name' => $request->name,
            'email' => $request->email,
            'password' => Hash::make($request->password),
        ]);
        $token = $user->createToken('auth-token')->plainTextToken;
        return response()->json([
            'user' => $user,
            'message' => 'registration success'
        ], 201);
    }
    public function login(Request $request)
    {
        $request->validate([
            'email' => 'required|email',
            'password' => 'required',
        ]);
        $user = User::where('email', $request->email)->first();
        if (!$user || !Hash::check($request->password, $user->password)) {
            throw ValidationException::withMessages([
                'email' => ['invalid credentials.'],
            ]);
        }
        $token = $user->createToken('auth-token')->plainTextToken;
        return response()->json([
            'access_token' => $token,
            'token_type' => 'Bearer',
            'user' => $user,
            'message' => 'login success'
        ]);
    }
    public function logout(Request $request)
    {
        $request->user()->currentAccessToken()->delete();
        return response()->json([
            'message' => 'logout success'
        ]);
    }
    public function user(Request $request)
    {
        return response()->json([
            'user' => $request->user(),
            'message' => 'user data retrieved successfully'
        ]);
    }
}
Let's break down some key parts of this code:
$token = $user->createToken('auth-token')->plainTextToken;
The createToken() method comes from the HasApiTokens trait and generates a plainTextToken for authentication.
$request->user()->currentAccessToken()->delete();
This line deletes the token that was generated and used by the user, effectively logging them out.
- Setting Up API Routes
Create or update the api.php file in the routes/ folder with this code:
<?php
use App\Http\Controllers\Api\AuthController;
use Illuminate\Support\Facades\Route;
Route::post('/register', [AuthController::class, 'register']);
Route::post('/login', [AuthController::class, 'login']);
Route::middleware('auth:sanctum')->group(function () {
    Route::post('/logout', [AuthController::class, 'logout']);
    Route::get('/get-user', [AuthController::class, 'user']);
});
We're using middleware('auth:sanctum') in a route group, which means all routes inside this group will be protected by auth:sanctum authentication.
Testing Your API with Postman
Let's use Postman to test our newly created API endpoints.
- User Registration
- POST
/api/register - Body:
{"name": "NganggurDev", "email": "bussines.nganggurdev@gmail.com", "password": "admin123", "password_confirmation": "admin123"}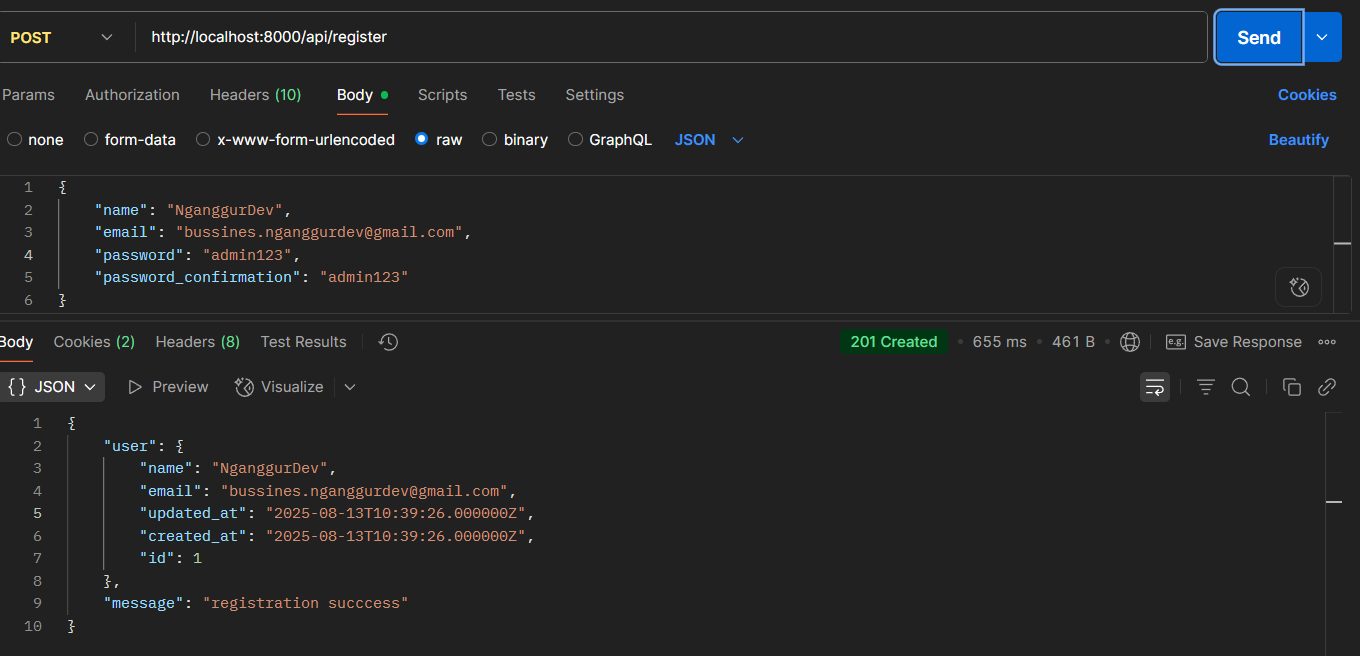
- User Login
- POST
/api/login - Body:
{"email": "bussines.nganggurdev@gmail.com", "password": "admin123"}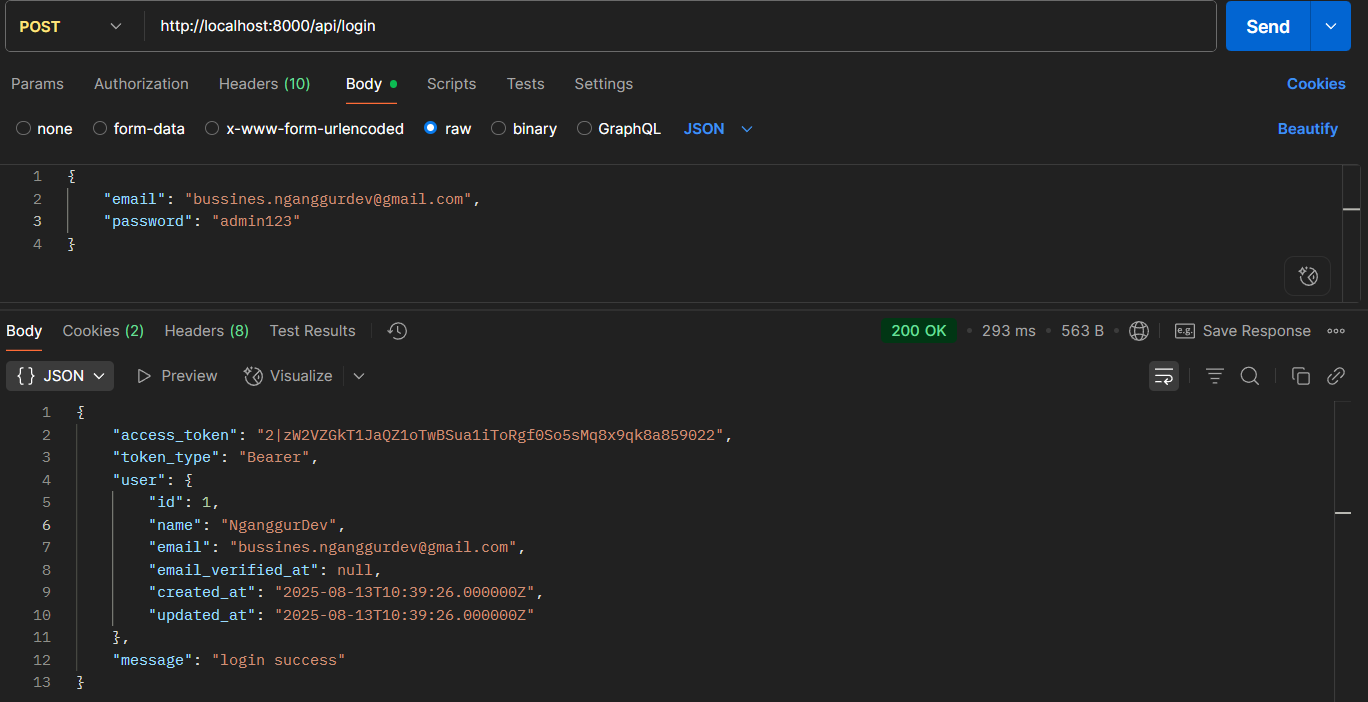
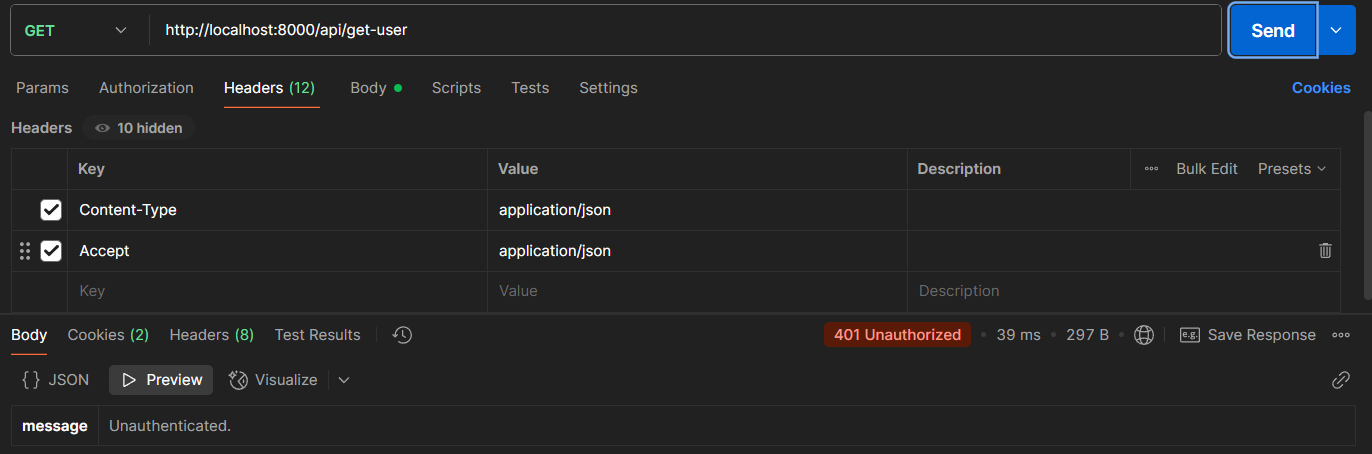
- Accessing Protected Routes
- GET
/api/get-user - Header:
Authorization: Bearer <access token>
Authenticated User Response
When you include a valid Bearer token, you'll get the user data successfully.
 Unauthenticated Response
Without a valid token, you'll receive a 401 Unauthorized error.
 4. User Logout
- POST
/api/logout - Header:
Authorization: Bearer <access token>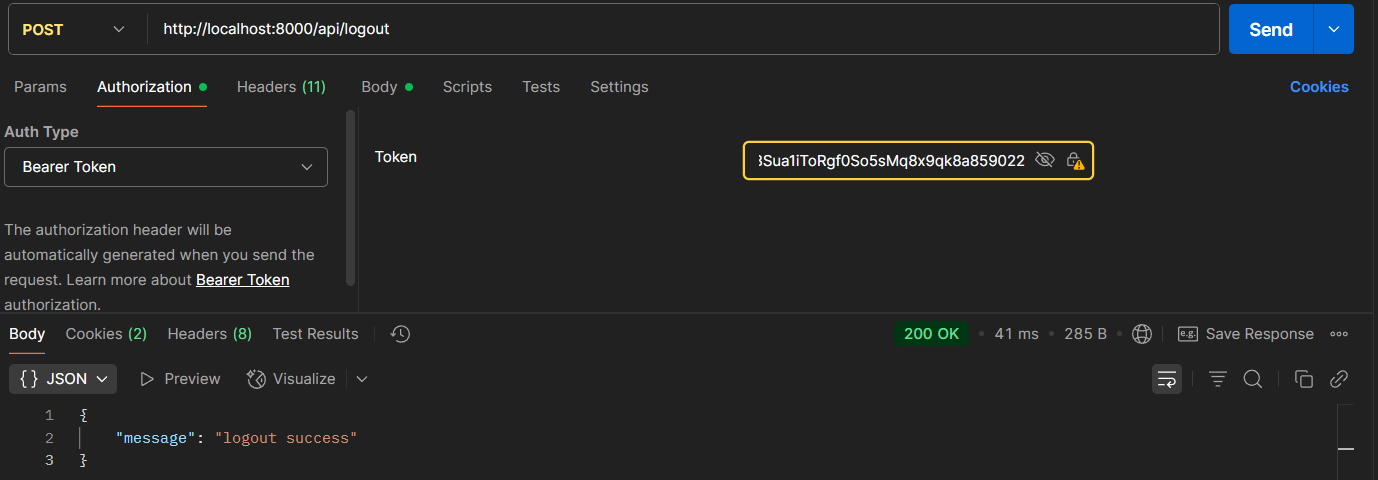
Common Issues You Might Encounter
-
CORS Problems Solution: Double-check that your CORS configuration is set up correctly.
-
401 Unauthorized Error Solution: Make sure your Authorization header is formatted correctly: Bearer {token}.
-
SPA Session Issues Solution: For SPAs, make sure to call the /sanctum/csrf-cookie endpoint before making authenticated requests.
-
Token Expiration Not Working as Expected Solution: Configure the expiration time in config/sanctum.php and implement custom expiration logic for specific tokens if needed.
-
Duplicate Tokens for Same User Solution: Implement a strategy to revoke old tokens when users log in again, or limit the maximum number of active tokens per user.
Wrapping Up
Laravel Sanctum provides an elegant solution for securing sensitive data in modern web applications. By following this guide, you've learned the fundamentals of implementing secure API authentication in Laravel 12.
Your APIs are now protected with token-based authentication that's both secure and easy to manage. This foundation will serve you well as you build more complex applications that require robust security measures.
Thanks for following along!